Android 14 init进程解析
2024-02-25 / 龙之叶   

前言

当bootloader启动后,启动kernel,kernel启动完后,在用户空间启动init进程,再通过init进程,来读取init.rc中的相关配置,从而来启动其他相关进程以及其他操作。
init进程启动主要分为两个阶段:

第一个阶段负责:

  • 创建文件系统目录并挂载相关的文件系统
  • 初始化日志输出
  • 启用SELinux安全策略
  • 为第二阶段做准备

第二阶段负责:

  • 创建进程会话密钥、并初始化属性系统
  • 执行SELinux第二阶段、并恢复一些文件安全上下文
  • 新建epoll、并初始化子进程终止信号处理函数
  • 设置其他系统属性、并开启属性服务
  • 解析init.rc等文件,建立rc文件的action、service,启动其他进程

init进程如何被启动?

init进程是在Kernel启动后,启动的第一个用户空间进程,PID为1
kernel-5.10/init/main.c

1
2
3
4
5
6
7
8
9
10
11
12
13
14
15
16
17
18
19
20
21
22
23
24
25
26
27
28
29
30
31
32
33
34
35
36
37
38
39
40
41
42
43
44
45
46
47
48
49
50
51
52
53
54
55
56
57
static int __ref kernel_init(void *unused)
{
int ret;

kernel_init_freeable();//进行init进程的一些初始化操作
/* need to finish all async __init code before freeing the memory */
async_synchronize_full();//等待所有异步调用执行完成,在释放内存前,必须完成所有的异步 __init 代码
ftrace_free_init_mem();
jump_label_invalidate_initmem();
free_initmem();//释放所有init.*中的内存
mark_readonly();

/*
* Kernel mappings are now finalized - update the userspace page-table
* to finalize PTI.
*/
pti_finalize();

system_state = SYSTEM_RUNNING;//设置系统状态为运行状态
numa_default_policy();//设定NUMA系统的默认内存访问策略

rcu_end_inkernel_boot();

bootprof_log_boot("Kernel_init_done");

if (ramdisk_execute_command) {//ramdisk_execute_command的值为“/init”
ret = run_init_process(ramdisk_execute_command);//运行根目录下的init进程 *****
if (!ret)
return 0;
pr_err("Failed to execute %s (error %d)\n",
ramdisk_execute_command, ret);
}

/*
* We try each of these until one succeeds.
*
* The Bourne shell can be used instead of init if we are
* trying to recover a really broken machine.
*/
if (execute_command) {//execute_command的值如果有定义就去根目录下找对应的应用程序,然后启动
ret = run_init_process(execute_command);
if (!ret)
return 0;
panic("Requested init %s failed (error %d).",
execute_command, ret);
}
if (!try_to_run_init_process("/sbin/init") ||
!try_to_run_init_process("/etc/init") ||
!try_to_run_init_process("/bin/init") ||
!try_to_run_init_process("/bin/sh"))//如果ramdisk_execute_command和execute_command定义的应用程序都没有找到,
//就到根目录下找 /sbin/init,/etc/init,/bin/init,/bin/sh 这四个应用程序进行启动

return 0;

panic("No working init found. Try passing init= option to kernel. "
"See Linux Documentation/admin-guide/init.rst for guidance.");
}

在/kernel/init/mian.c#kernel_init()方法调用了run_init_process()进行启动init进程

init进程入口

在Android Q(10.0)之前的init入口函数是init.cpp,从Android Q(10.0)开始init的入口函数是main.cpp,把各个阶段的操作分离开来,是代码更加简洁。
进入到main.cpp#main()
system/core/init/main.cpp

1
2
3
4
5
6
7
8
9
10
11
12
13
14
15
16
17
18
19
20
21
22
23
24
25
26
27
28
29
30
31
32
33
34
35
36
37
38
39
40
41
42
43
44
45
46
47
48
49
/*
* 1.第一个参数argc表示参数个数,第二个参数是参数列表,也就是具体的参数
* 2.main函数有四个参数入口,
*一是参数中有ueventd,进入ueventd_main
*二是参数中有subcontext,进入InitLogging 和SubcontextMain
*三是参数中有selinux_setup,进入SetupSelinux
*四是参数中有second_stage,进入SecondStageMain
* 3.main的执行顺序如下:
* (1)ueventd_main init进程创建子进程ueventd,
* 并将创建设备节点文件的工作托付给ueventd,ueventd通过两种方式创建设备节点文件
* (2)FirstStageMain 启动第一阶段
* (3)SetupSelinux 加载selinux规则,并设置selinux日志,完成SELinux相关工作
* (4)SecondStageMain 启动第二阶段
*/

int main(int argc, char** argv) {
#if __has_feature(address_sanitizer)
__asan_set_error_report_callback(AsanReportCallback);
#endif
// Boost prio which will be restored later
setpriority(PRIO_PROCESS, 0, -20);

//当argv[0]的内容为ueventd时,strcmp的值为0,ueventd主要是负责设备节点的创建、权限设定等一些列工作
if (!strcmp(basename(argv[0]), "ueventd")) {
return ueventd_main(argc, argv);
}

//当传入的参数个数大于1时
if (argc > 1) {
//参数为subcontext,初始化日志系统
if (!strcmp(argv[1], "subcontext")) {
android::base::InitLogging(argv, &android::base::KernelLogger);
const BuiltinFunctionMap& function_map = GetBuiltinFunctionMap();

return SubcontextMain(argc, argv, &function_map);
}
//参数为selinux_setup,启动Selinux安全策略
if (!strcmp(argv[1], "selinux_setup")) {
return SetupSelinux(argv);
}

//参数为“sencond_stage”,启动init进程第二阶段
if (!strcmp(argv[1], "second_stage")) {
return SecondStageMain(argc, argv);
}
}
//默认启动init进程第一阶段
return FirstStageMain(argc, argv);
}

ueventd_main()

Android根文件系统的镜像中不存在“/dev”目录,该目录是init进程启动后动态创建的。所以,建立Android中设备节点文件需要init进程完成,为此init进程创建子进程ueventd,并将创建设备节点文件的工作托付给ueventd。
ueventd通过两种方式创建设备节点文件:
第一种方式对应“冷插拔”(Cold Plug),即以预先定义的设备信息为基础,当ueventd启动后,同一创建设备节点文件。这一类设备节点文件也被称为静态节点文件。
第二种方式对应“热插拔”(Hot Plug),即在系统运行中,当有设备插入USB端口时,ueventd就会接收到这一事件,为插入的设备动态创建设备节点文件。这一类设备节点文件也被称为动态节点文件。
进入ueventd.cpp#ueventd_main()
system/core/init/ueventd.cpp

1
2
3
4
5
6
7
8
9
10
11
12
13
14
15
16
17
18
19
20
21
22
23
24
25
26
27
28
29
30
31
32
33
34
35
36
37
38
39
40
41
42
43
44
45
46
47
48
49
50
51
52
53
54
55
56
57
58
59
60
61
62
63
64
65
66
67
int ueventd_main(int argc, char** argv) {
/*
* init sets the umask to 077 for forked processes. We need to
* create files with exact permissions, without modification by
* the umask.
*/
//设置新建文件的默认值,这个与chmod相反,这里相当于新建文件后的权限为666
umask(000);

//初始化内核日志,位于节点/dev/kmsg,此时logd、logcat进程还没有起来
//采用kernel的log系统,打开的设备节点/dev/kmsg,那么可通过cat /dev/kmsg来获取内核log
android::base::InitLogging(argv, &android::base::KernelLogger);

LOG(INFO) << "ueventd started!";

//注册selinux相关的用于打印log的回调函数
SelinuxSetupKernelLogging();
SelabelInitialize();

std::vector<std::unique_ptr<UeventHandler>> uevent_handlers;
//解析xml,根据不同SOC厂商获取不同的hardware rc文件
auto ueventd_configuration = GetConfiguration();

uevent_handlers.emplace_back(std::make_unique<DeviceHandler>(
std::move(ueventd_configuration.dev_permissions),
std::move(ueventd_configuration.sysfs_permissions),
std::move(ueventd_configuration.subsystems), android::fs_mgr::GetBootDevices(), true));
uevent_handlers.emplace_back(std::make_unique<FirmwareHandler>(
std::move(ueventd_configuration.firmware_directories),
std::move(ueventd_configuration.external_firmware_handlers)));

//冷启动
if (ueventd_configuration.enable_modalias_handling) {
std::vector<std::string> base_paths = {"/odm/lib/modules", "/vendor/lib/modules"};
uevent_handlers.emplace_back(std::make_unique<ModaliasHandler>(base_paths));
}
UeventListener uevent_listener(ueventd_configuration.uevent_socket_rcvbuf_size);

if (!android::base::GetBoolProperty(kColdBootDoneProp, false)) {
ColdBoot cold_boot(uevent_listener, uevent_handlers,
ueventd_configuration.enable_parallel_restorecon);
cold_boot.Run();
}

for (auto& uevent_handler : uevent_handlers) {
uevent_handler->ColdbootDone();
}

//忽略子进程终止信号
signal(SIGCHLD, SIG_IGN);

//在最后一次调用waitpid()和为上面的sigchld设置SIG_IGN之间退出的获取和挂起的子级
while (waitpid(-1, nullptr, WNOHANG) > 0) {
}

// Restore prio before main loop
setpriority(PRIO_PROCESS, 0, 0);
//监听来自驱动的uevent,进行“热插拔”处理
uevent_listener.Poll([&uevent_handlers](const Uevent& uevent) {
for (auto& uevent_handler : uevent_handlers) {
uevent_handler->HandleUevent(uevent);
}
return ListenerAction::kContinue;
});

return 0;
}

init进程启动第一阶段first_stage_init.cpp

主要负责:

  • 创建文件系统目录并挂载相关的文件系统
  • 初始化日志输出
  • 启用SELinux安全策略
  • 为第二阶段做准备

system/core/init/first_stage_init.cpp

1
2
3
4
5
6
7
8
9
10
11
12
13
14
15
16
17
18
19
20
21
22
23
24
25
26
27
28
29
30
31
32
33
34
35
36
37
38
39
40
41
42
43
44
45
46
47
48
49
50
51
52
53
54
55
56
57
58
59
60
61
62
63
64
65
66
67
68
69
70
71
72
73
74
75
76
77
78
79
80
81
82
83
84
85
86
87
88
89
90
91
92
93
94
95
96
97
98
99
100
101
102
103
104
105
106
107
108
109
110
111
112
113
114
115
116
117
118
119
120
121
122
123
124
125
126
127
128
129
130
131
132
133
134
135
136
137
138
139
140
int FirstStageMain(int argc, char** argv) {
//init crash时重启引导加载程序

//这个函数主要作用将各种信号量,如SIGABRT,SIGBUS等的行为设置为SA_RESTART,一旦监听到这些信号即执行重启系统
if (REBOOT_BOOTLOADER_ON_PANIC) {
InstallRebootSignalHandlers();
}

boot_clock::time_point start_time = boot_clock::now();

std::vector<std::pair<std::string, int>> errors;
#define CHECKCALL(x) \
if ((x) != 0) errors.emplace_back(#x " failed", errno);

// Clear the umask.
//清空文件权限
umask(0);

CHECKCALL(clearenv());
CHECKCALL(setenv("PATH", _PATH_DEFPATH, 1));

//在RAM内存上获取基本的文件系统,剩余的被rc文件所用
CHECKCALL(mount("tmpfs", "/dev", "tmpfs", MS_NOSUID, "mode=0755"));
CHECKCALL(mkdir("/dev/pts", 0755));
CHECKCALL(mkdir("/dev/socket", 0755));
CHECKCALL(mkdir("/dev/dm-user", 0755));
CHECKCALL(mount("devpts", "/dev/pts", "devpts", 0, NULL));
#define MAKE_STR(x) __STRING(x)
CHECKCALL(mount("proc", "/proc", "proc", 0, "hidepid=2,gid=" MAKE_STR(AID_READPROC)));
#undef MAKE_STR
//非特权应用不能使用Android cmdline
CHECKCALL(chmod("/proc/cmdline", 0440));
std::string cmdline;
android::base::ReadFileToString("/proc/cmdline", &cmdline);
// Don't expose the raw bootconfig to unprivileged processes.
chmod("/proc/bootconfig", 0440);
std::string bootconfig;
android::base::ReadFileToString("/proc/bootconfig", &bootconfig);
gid_t groups[] = {AID_READPROC};
CHECKCALL(setgroups(arraysize(groups), groups));
CHECKCALL(mount("sysfs", "/sys", "sysfs", 0, NULL));
CHECKCALL(mount("selinuxfs", "/sys/fs/selinux", "selinuxfs", 0, NULL));

CHECKCALL(mknod("/dev/kmsg", S_IFCHR | 0600, makedev(1, 11)));

if constexpr (WORLD_WRITABLE_KMSG) {
CHECKCALL(mknod("/dev/kmsg_debug", S_IFCHR | 0622, makedev(1, 11)));
}

CHECKCALL(mknod("/dev/random", S_IFCHR | 0666, makedev(1, 8)));
CHECKCALL(mknod("/dev/urandom", S_IFCHR | 0666, makedev(1, 9)));

//这对于日志包装器是必需的,它在ueventd运行之前被调用
CHECKCALL(mknod("/dev/ptmx", S_IFCHR | 0666, makedev(5, 2)));
CHECKCALL(mknod("/dev/null", S_IFCHR | 0666, makedev(1, 3)));

//在第一阶段挂在tmpfs、mnt/vendor、mount/product分区。其他的分区不需要在第一阶段加载,
//只需要在第二阶段通过rc文件解析来加载
CHECKCALL(mount("tmpfs", "/mnt", "tmpfs", MS_NOEXEC | MS_NOSUID | MS_NODEV,
"mode=0755,uid=0,gid=1000"));
//创建可供读写的vendor目录
CHECKCALL(mkdir("/mnt/vendor", 0755));

CHECKCALL(mkdir("/mnt/product", 0755));

// 挂载APEX,这在Android 10.0中特殊引入,用来解决碎片化问题,类似一种组件方式,对Treble的增强,
// 不写谷歌特殊更新不需要完整升级整个系统版本,只需要像升级APK一样,进行APEX组件升级
CHECKCALL(mount("tmpfs", "/debug_ramdisk", "tmpfs", MS_NOEXEC | MS_NOSUID | MS_NODEV,
"mode=0755,uid=0,gid=0"));

// /second_stage_resources is used to preserve files from first to second
// stage init
CHECKCALL(mount("tmpfs", kSecondStageRes, "tmpfs", MS_NOEXEC | MS_NOSUID | MS_NODEV,
"mode=0755,uid=0,gid=0"))
#undef CHECKCALL

//把标准输入、标准输出和标准错误重定向到空设备文件“/dev/null”
SetStdioToDevNull(argv);
// Now that tmpfs is mounted on /dev and we have /dev/kmsg, we can actually
// talk to the outside world...
#ifdef MTK_LOG
#ifndef MTK_LOG_DISABLERATELIMIT
if (cmdline.find("init.mtklogdrl=1") != std::string::npos)
SetMTKLOGDISABLERATELIMIT();
#else
SetMTKLOGDISABLERATELIMIT();
#endif // MTK_LOG_DISABLERATELIMIT

if (GetMTKLOGDISABLERATELIMIT())
InitKernelLogging_split(argv);
else
InitKernelLogging(argv);
#else
//在/dev目录下挂载好tmpfs以及kmsg
//这样就可以初始化/kernel Log系统,供用户打印log
InitKernelLogging(argv);
#endif

......

/*
初始化一些必须的分区
主要作用是去解析/proc/device-tree/firmware/android/fstab
然后得到“/system”,“/vendor”,“/odm”三个目录的挂载信息
*/
if (!DoFirstStageMount(!created_devices)) {
LOG(FATAL) << "Failed to mount required partitions early ...";
}

struct stat new_root_info;
if (stat("/", &new_root_info) != 0) {
PLOG(ERROR) << "Could not stat(\"/\"), not freeing ramdisk";
old_root_dir.reset();
}

if (old_root_dir && old_root_info.st_dev != new_root_info.st_dev) {
FreeRamdisk(old_root_dir.get(), old_root_info.st_dev);
}

SetInitAvbVersionInRecovery();

setenv(kEnvFirstStageStartedAt, std::to_string(start_time.time_since_epoch().count()).c_str(),
1);

//启动init进程,传入参数selinux_steup
//执行命令:/system/bin/init selinux_setup
const char* path = "/system/bin/init";
const char* args[] = {path, "selinux_setup", nullptr};
auto fd = open("/dev/kmsg", O_WRONLY | O_CLOEXEC);
dup2(fd, STDOUT_FILENO);
dup2(fd, STDERR_FILENO);
close(fd);
execv(path, const_cast<char**>(args));

// execv() only returns if an error happened, in which case we
// panic and never fall through this conditional.
PLOG(FATAL) << "execv(\"" << path << "\") failed";

return 1;
}

加载SELinux规则

SELinux是「Security-Enhanced Linux」的简称,是美国国家安全局「NSA=The National Security Agency」
和SCC(Secure Computing Corporation)开发的 Linux的一个扩张强制访问控制安全模块。在这种访问控制体系的限制下,进程只能访问那些在他的任务中所需要文件。
SElinux有两种工作模式:

  1. permissive,所有的操作都被允许(即没有MAC),但是如果违法权限的话,会记录日志,一般eng模式用
  2. enforcing,所有操作都会进行权限检查,一般user和user-debug模式用

不管是security_setenforce还是security_getenforce都是去操作/sys/fs/selinux/enforce文件,0表示permissive 1表示enforcing
SetupSelinux:初始化selinux,加载SElinux规则,配置SWLinux相关log输出,并启动第二阶段
system/core/init/selinux.cpp

1
2
3
4
5
6
7
8
9
10
11
12
13
14
15
16
17
18
19
20
21
22
23
24
25
26
27
28
29
30
31
32
33
34
35
36
37
38
39
40
41
42
43
44
45
46
47
48
49
50
51
52
53
54
55
56
57
58
59
60
61
62
63
64
65
66
67
68
69
70
71
72
73
74
75
76
77
78
79
80
81
82
83
84
85
86
87
88
89
90
91
92
/*此函数初始化selinux,然后执行init以在init selinux中运行*/
int SetupSelinux(char** argv) {
#ifdef JOURNEY_FEATURE_ROOT_MODE
initJourneyRootMode();
#endif
SetStdioToDevNull(argv);
#ifdef MTK_LOG
#ifndef MTK_LOG_DISABLERATELIMIT
{
std::string cmdline;
android::base::ReadFileToString("/proc/cmdline", &cmdline);

if (cmdline.find("init.mtklogdebuggable=1") != std::string::npos)
SetMTKLOGDISABLERATELIMIT();
}
#else
SetMTKLOGDISABLERATELIMIT();
#endif // MTK_LOG_DISABLERATELIMIT
if (GetMTKLOGDISABLERATELIMIT())
InitKernelLogging_split(argv);
else
InitKernelLogging(argv);
#else
//初始化Kernel日志
InitKernelLogging(argv);
#endif

//Debug版本init crash时重启引导加载程序
if (REBOOT_BOOTLOADER_ON_PANIC) {
InstallRebootSignalHandlers();
}

boot_clock::time_point start_time = boot_clock::now();

MountMissingSystemPartitions();

#ifdef MTK_LOG
if (GetMTKLOGDISABLERATELIMIT())
SelinuxSetupKernelLogging_split();
else
SelinuxSetupKernelLogging();
#else
//注册回调,用来设置需要写入kmsg的selinux日志
SelinuxSetupKernelLogging();
#endif

LOG(INFO) << "Opening SELinux policy";

// Read the policy before potentially killing snapuserd.
std::string policy;
ReadPolicy(&policy);

auto snapuserd_helper = SnapuserdSelinuxHelper::CreateIfNeeded();
if (snapuserd_helper) {
// Kill the old snapused to avoid audit messages. After this we cannot
// read from /system (or other dynamic partitions) until we call
// FinishTransition().
snapuserd_helper->StartTransition();
}

LoadSelinuxPolicy(policy);

if (snapuserd_helper) {
// Before enforcing, finish the pending snapuserd transition.
snapuserd_helper->FinishTransition();
snapuserd_helper = nullptr;
}

//加载SElinux规则
SelinuxSetEnforcement();

// We're in the kernel domain and want to transition to the init domain. File systems that
// store SELabels in their xattrs, such as ext4 do not need an explicit restorecon here,
// but other file systems do. In particular, this is needed for ramdisks such as the
// recovery image for A/B devices.
if (selinux_android_restorecon("/system/bin/init", 0) == -1) {
PLOG(FATAL) << "restorecon failed of /system/bin/init failed";
}

setenv(kEnvSelinuxStartedAt, std::to_string(start_time.time_since_epoch().count()).c_str(), 1);

//准备启动init进程,传入参数second_stage,进入到第二阶段
const char* path = "/system/bin/init";
const char* args[] = {path, "second_stage", nullptr};
execv(path, const_cast<char**>(args));

// execv() only returns if an error happened, in which case we
// panic and never return from this function.
PLOG(FATAL) << "execv(\"" << path << "\") failed";

return 1;
}

SelinuxSetEnforcement():加载SeLinux规则
system/core/init/selinux.cpp

1
2
3
4
5
6
7
8
9
10
11
12
13
14
15
16
17
void SelinuxSetEnforcement() {
//获取当前Kernel的工作模式
bool kernel_enforcing = (security_getenforce() == 1);
//获取工作模式的配置
bool is_enforcing = IsEnforcing();
//如果当前的工作模式与配置的不同,就将当前的工作模式改掉
if (kernel_enforcing != is_enforcing) {
if (security_setenforce(is_enforcing)) {
PLOG(FATAL) << "security_setenforce(" << (is_enforcing ? "true" : "false")
<< ") failed";
}
}

if (auto result = WriteFile("/sys/fs/selinux/checkreqprot", "0"); !result.ok()) {
LOG(FATAL) << "Unable to write to /sys/fs/selinux/checkreqprot: " << result.error();
}
}

init进程启动第二阶段

主要负责:

  • 创建进程会话密钥,并初始化属性系统
  • 执行SELinux第二阶段,并恢复一些文件安全上下文
  • 新建epoll,并初始化子进程终止信号处理函数
  • 设置其他系统属性,并开启属性服务
  • 解析init.rc等文件,建立rc文件的action、service,启动其他进程

system/core/init/init.cpp

1
2
3
4
5
6
7
8
9
10
11
12
13
14
15
16
17
18
19
20
21
22
23
24
25
26
27
28
29
30
31
32
33
34
35
36
37
38
39
40
41
42
43
44
45
46
47
48
49
50
51
52
53
54
55
56
57
58
59
60
61
62
63
64
65
66
67
68
69
70
71
72
73
74
75
76
77
78
79
80
81
82
83
84
85
86
87
88
89
90
91
92
93
94
95
96
97
98
99
100
101
102
103
104
105
106
107
108
109
110
111
112
113
114
115
116
117
118
119
120
121
122
123
124
125
126
127
128
129
130
131
132
133
134
135
136
137
138
139
140
141
142
143
144
145
146
147
148
149
150
151
152
153
154
155
156
157
158
159
160
161
162
163
164
165
166
167
168
169
170
171
172
173
174
175
176
177
178
179
180
181
182
183
184
185
186
187
188
189
190
191
192
193
194
195
196
197
198
199
200
201
202
203
204
205
206
207
208
209
210
211
212
213
214
215
216
217
218
219
220
221
222
223
224
225
226
227
228
229
230
231
232
233
234
235
236
237
238
239
240
241
242
243
244
245
246
247
248
249
250
251
252
253
254
255
256
257
258
259
260
261
262
263
264
265
266
267
268
269
270
271
272
273
274
275
276
277
278
279
280
281
282
283
284
285
286
287
288
289
290
291
292
293
294
295
296
297
298
299
300
301
302
303
304
305
306
307
308
309
310
311
312
313
314
315
316
317
318
int SecondStageMain(int argc, char** argv) {
#ifdef JOURNEY_FEATURE_ROOT_MODE
initJourneyRootMode();
#endif
/*
*init crash时重启引导加载程序
*这个函数主要作用将各种信号量,如SIGABRT,SIGBUS等的行为设置为SA_RESTART,一旦监听到这些信号即执行重启系统
*/
if (REBOOT_BOOTLOADER_ON_PANIC) {
InstallRebootSignalHandlers();
}

boot_clock::time_point start_time = boot_clock::now();

trigger_shutdown = [](const std::string& command) { shutdown_state.TriggerShutdown(command); };
//把标准输入、标准输出和标准错误重定向到空设备文件“/dev/null"
SetStdioToDevNull(argv);
#ifdef MTK_LOG
#ifndef MTK_LOG_DISABLERATELIMIT
{
std::string cmdline;
android::base::ReadFileToString("/proc/cmdline", &cmdline);

if (cmdline.find("init.mtklogdrl=1") != std::string::npos)
SetMTKLOGDISABLERATELIMIT();

const char* force_debuggable_env = getenv("INIT_FORCE_DEBUGGABLE");
if (force_debuggable_env && AvbHandle::IsDeviceUnlocked()) {
SetMTKLOGDISABLERATELIMIT();
}
}
#else
SetMTKLOGDISABLERATELIMIT();
#endif // MTK_LOG_DISABLERATELIMIT

if (GetMTKLOGDISABLERATELIMIT())
InitKernelLogging_split(argv);
else
InitKernelLogging(argv);
#else
//在/dev目录下挂载好tmpfs以及kmsg
//这样就可以初始化/kernel log系统,供用户打印log
InitKernelLogging(argv);
#endif
LOG(INFO) << "init second stage started!";

// Update $PATH in the case the second stage init is newer than first stage init, where it is
// first set.
if (setenv("PATH", _PATH_DEFPATH, 1) != 0) {
PLOG(FATAL) << "Could not set $PATH to '" << _PATH_DEFPATH << "' in second stage";
}

// Init should not crash because of a dependence on any other process, therefore we ignore
// SIGPIPE and handle EPIPE at the call site directly. Note that setting a signal to SIG_IGN
// is inherited across exec, but custom signal handlers are not. Since we do not want to
// ignore SIGPIPE for child processes, we set a no-op function for the signal handler instead.
{
struct sigaction action = {.sa_flags = SA_RESTART};
action.sa_handler = [](int) {};
sigaction(SIGPIPE, &action, nullptr);
}

// Set init and its forked children's oom_adj.
if (auto result =
WriteFile("/proc/1/oom_score_adj", StringPrintf("%d", DEFAULT_OOM_SCORE_ADJUST));
!result.ok()) {
LOG(ERROR) << "Unable to write " << DEFAULT_OOM_SCORE_ADJUST
<< " to /proc/1/oom_score_adj: " << result.error();
}

// Set up a session keyring that all processes will have access to. It
// will hold things like FBE encryption keys. No process should override
// its session keyring.
//01.创建进程会话密钥并初始化属性系统
keyctl_get_keyring_ID(KEY_SPEC_SESSION_KEYRING, 1);

// Indicate that booting is in progress to background fw loaders, etc.
//创建/dev/.booting文件,就是个标记,表示booting进行中
close(open("/dev/.booting", O_WRONLY | O_CREAT | O_CLOEXEC, 0000));

// See if need to load debug props to allow adb root, when the device is unlocked.
const char* force_debuggable_env = getenv("INIT_FORCE_DEBUGGABLE");
bool load_debug_prop = false;
if (force_debuggable_env && AvbHandle::IsDeviceUnlocked()) {
load_debug_prop = "true"s == force_debuggable_env;
}
unsetenv("INIT_FORCE_DEBUGGABLE");

// Umount the debug ramdisk so property service doesn't read .prop files from there, when it
// is not meant to.
if (!load_debug_prop) {
UmountDebugRamdisk();
}

//初始化属性系统,并从指定文件读取属性
PropertyInit();

// Umount second stage resources after property service has read the .prop files.
UmountSecondStageRes();

// Umount the debug ramdisk after property service has read the .prop files when it means to.
if (load_debug_prop) {
UmountDebugRamdisk();
}

// Mount extra filesystems required during second stage init
MountExtraFilesystems();

// Now set up SELinux for second stage.
#ifdef MTK_LOG
if (GetMTKLOGDISABLERATELIMIT())
SelinuxSetupKernelLogging_split();
else
SelinuxSetupKernelLogging();
#else
SelinuxSetupKernelLogging();
#endif
SelabelInitialize();
/*
02.进行SELinux第二阶段并恢复一些文件安全上下文
恢复相关文件的安全上下文,因为这些文件是在SELinux安全机制初始化前创建的
所以需要重新恢复上下文
*/
SelinuxRestoreContext();

/*
03.新建epoll并初始化子进程终止信号处理函数
创建epoll实例,并返回epoll的文件描述
*/
Epoll epoll;
if (auto result = epoll.Open(); !result.ok()) {
PLOG(FATAL) << result.error();
}

#ifdef G1122717
// Watch properties with specific meanings to init.
LOG(INFO) << "Apply watching properties with specific meanings to init.";
ActionManager::GetInstance().StartWatchingProperty("sys.powerctl");
ActionManager::GetInstance().StartWatchingProperty("ro.persistent_properties.ready");
ActionManager::GetInstance().StartWatchingProperty(kColdBootDoneProp);
#endif
/*
主要是创建handler处理子进程终止信号,注册一个signal到epoll进行监听
进行子继承处理
*/
InstallSignalFdHandler(&epoll);
InstallInitNotifier(&epoll);

//04.设置其他系统属性并开启系统属性服务
StartPropertyService(&property_fd);

#if defined(MTK_LOG) && defined(MTK_COMMAND_WDOG)
ActionManager::GetInstance().StartCommandWDOG();
#endif

// Make the time that init stages started available for bootstat to log.
RecordStageBoottimes(start_time);

// Set libavb version for Framework-only OTA match in Treble build.
if (const char* avb_version = getenv("INIT_AVB_VERSION"); avb_version != nullptr) {
SetProperty("ro.boot.avb_version", avb_version);
}
unsetenv("INIT_AVB_VERSION");

fs_mgr_vendor_overlay_mount_all();
export_oem_lock_status();
MountHandler mount_handler(&epoll);
SetUsbController();
#ifdef JOURNEY_FEATURE_SECURE
CheckJourneySecureMode();
#endif

const BuiltinFunctionMap& function_map = GetBuiltinFunctionMap();
Action::set_function_map(&function_map);

if (!SetupMountNamespaces()) {
PLOG(FATAL) << "SetupMountNamespaces failed";
}

//初始化文件上下文
InitializeSubcontext();

ActionManager& am = ActionManager::GetInstance();
ServiceList& sm = ServiceList::GetInstance();
/*
05.解析init.rc等文件,建立rc文件的action、service,启动其他进程
*/
LoadBootScripts(am, sm);

// Turning this on and letting the INFO logging be discarded adds 0.2s to
// Nexus 9 boot time, so it's disabled by default.
if (false) DumpState();

// Make the GSI status available before scripts start running.
//当GSI脚本running时,确保GSI状态可用
auto is_running = android::gsi::IsGsiRunning() ? "1" : "0";
SetProperty(gsi::kGsiBootedProp, is_running);
auto is_installed = android::gsi::IsGsiInstalled() ? "1" : "0";
SetProperty(gsi::kGsiInstalledProp, is_installed);

am.QueueBuiltinAction(SetupCgroupsAction, "SetupCgroups");
am.QueueBuiltinAction(SetKptrRestrictAction, "SetKptrRestrict");
am.QueueBuiltinAction(TestPerfEventSelinuxAction, "TestPerfEventSelinux");
//执行rc文件中触发器为 on early-init的语句
am.QueueEventTrigger("early-init");

// Queue an action that waits for coldboot done so we know ueventd has set up all of /dev...
//等冷插拔设备初始化完成
am.QueueBuiltinAction(wait_for_coldboot_done_action, "wait_for_coldboot_done");
// ... so that we can start queuing up actions that require stuff from /dev.
am.QueueBuiltinAction(SetMmapRndBitsAction, "SetMmapRndBits");
//设备组合键的初始化操作
Keychords keychords;
am.QueueBuiltinAction(
[&epoll, &keychords](const BuiltinArguments& args) -> Result<void> {
for (const auto& svc : ServiceList::GetInstance()) {
keychords.Register(svc->keycodes());
}
keychords.Start(&epoll, HandleKeychord);
return {};
},
"KeychordInit");

// Trigger all the boot actions to get us started.
//执行rc文件中触发器为on init的语句
am.QueueEventTrigger("init");

// Don't mount filesystems or start core system services in charger mode.
/*
当设备处于充电模式时,不需要mount文件系统或者启动系统服务
充电模式下,将charger加入执行队列,否则把late-init加入执行队列
*/
std::string bootmode = GetProperty("ro.bootmode", "");
if (bootmode == "charger") {
am.QueueEventTrigger("charger");
} else {
am.QueueEventTrigger("late-init");
}

// Run all property triggers based on current state of the properties.
//基于属性当前状态,运行所有的属性触发器
am.QueueBuiltinAction(queue_property_triggers_action, "queue_property_triggers");

// Restore prio before main loop
setpriority(PRIO_PROCESS, 0, 0);
while (true) {
// By default, sleep until something happens.
auto epoll_timeout = std::optional<std::chrono::milliseconds>{};

auto shutdown_command = shutdown_state.CheckShutdown();
if (shutdown_command) {
LOG(INFO) << "Got shutdown_command '" << *shutdown_command
<< "' Calling HandlePowerctlMessage()";
HandlePowerctlMessage(*shutdown_command);
shutdown_state.set_do_shutdown(false);
}

//依次执行每个action中携带command对应的执行函数
if (!(prop_waiter_state.MightBeWaiting() || Service::is_exec_service_running())) {
am.ExecuteOneCommand();
}
if (!IsShuttingDown()) {
auto next_process_action_time = HandleProcessActions();

// If there's a process that needs restarting, wake up in time for that.
if (next_process_action_time) {
epoll_timeout = std::chrono::ceil<std::chrono::milliseconds>(
*next_process_action_time - boot_clock::now());
if (*epoll_timeout < 0ms) epoll_timeout = 0ms;
}
}

if (!(prop_waiter_state.MightBeWaiting() || Service::is_exec_service_running())) {
// If there's more work to do, wake up again immediately.
if (am.HasMoreCommands()) epoll_timeout = 0ms;
}

#ifdef MTK_LOG
int log_ms = _LogReap();//PropSetLogReap();
if (log_ms > -1 && (!epoll_timeout || epoll_timeout->count() > log_ms))
epoll_timeout = std::chrono::milliseconds(log_ms);

if (GetMTKLOGDISABLERATELIMIT()) {
if (!Getwhilepiggybacketed(1) && Getwhileepduration(1) > 1999)
LOG(INFO) << "Lastest epoll wait tooks " << Getwhileepduration(1) << "ms";
}

android::base::Timer t;

auto pending_functions = epoll.Wait(epoll_timeout);

if (GetMTKLOGDISABLERATELIMIT()) {
uint64_t duration = t.duration().count();
uint64_t nowms = std::chrono::duration_cast<std::chrono::milliseconds>(boot_clock::now().time_since_epoch()).count();
Setwhiletime(1, duration, nowms);
}
#else
auto pending_functions = epoll.Wait(epoll_timeout);
#endif
if (!pending_functions.ok()) {
LOG(ERROR) << pending_functions.error();
} else if (!pending_functions->empty()) {
// We always reap children before responding to the other pending functions. This is to
// prevent a race where other daemons see that a service has exited and ask init to
// start it again via ctl.start before init has reaped it.
ReapAnyOutstandingChildren();
for (const auto& function : *pending_functions) {
(*function)();
}
}
if (!IsShuttingDown()) {
HandleControlMessages();
SetUsbController();
}
}

return 0;
}

信号处理

init是一个守护进程,为了防止init的子进程成为僵尸进程(zombie process),需要init在子进程在结束时获取子进程的结束码,通过结束码将程序表中的子进程移除,防止成为僵尸进程的子进程占用程序表的空间(程序表的空间达到上限时,系统就不能再启动新的进程了,会引起严重的系统问题)。

信号处理主要工作:

  • 初始化信号signal句柄
  • 循环处理子进程
  • 注册epoll句柄
  • 处理子进程终止

注:EPOLL类似于POLL,是Linux中用来做事件触发的,跟EventBus功能差不多。linux很长的时间都在使用select来做事件触发,它是通过轮询来处理的,轮询的fd数目越多,自然耗时越多,对于大量的描述符处理,EPOLL更有优势

InstallSignalFdHandler

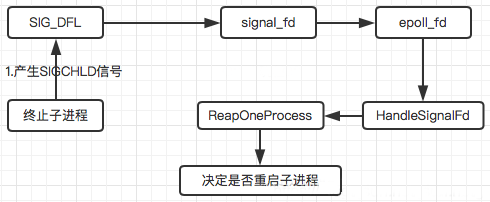
在linux当中,父进程是通过捕捉SIGCHLD信号来得知子进程运行结束的情况,SIGCHLD信号会在子进程终止的时候发出,了解这些背景后,我们来看看init进程如何处理这个信号。

  1. 新建一个sigaction结构体,sa_handler是信号处理函数,指向内核指定的函数指针SIG_DFL和Android 9.0及之前的版本不同,这里不再通过socket的读写句柄进行接收信号,改成了内核的信号处理函数SIG_DFL。
  2. sigaction(SIGCHLD, &act, nullptr) 这个是建立信号绑定关系,也就是说当监听到SIGCHLD信号时,由act这个sigaction结构体处理
  3. RegisterHandler 的作用就是signal_read_fd(之前的s[1])收到信号,触发handle_signal

终上所述,InstallSignalFdHandler函数的作用就是,接收到SIGCHLD信号时触发HandleSignalFd进行信号处理

信号处理示意图:

system/core/init/init.cpp

1
2
3
4
5
6
7
8
9
10
11
12
13
14
15
16
17
18
19
20
21
22
23
24
25
26
27
28
29
30
31
32
33
34
35
36
static void InstallSignalFdHandler(Epoll* epoll) {
//SA_NOCLDSTOP使init进程只有在其进程终止时才会受到SIGCHLD信号
const struct sigaction act { .sa_handler = SIG_DFL, .sa_flags = SA_NOCLDSTOP };
sigaction(SIGCHLD, &act, nullptr);

sigset_t mask;
sigemptyset(&mask);
sigaddset(&mask, SIGCHLD);

if (!IsRebootCapable()) {
//如果init不具备CAP_SYS_BOOT的能力,则它此时正值容器中运行
//在这种场景下,接收SIGTERM将会导致系统关闭
sigaddset(&mask, SIGTERM);
}

if (sigprocmask(SIG_BLOCK, &mask, nullptr) == -1) {
PLOG(FATAL) << "failed to block signals";
}

//注册处理程序以解除对子进程中的信号的阻止
const int result = pthread_atfork(nullptr, nullptr, &UnblockSignals);
if (result != 0) {
LOG(FATAL) << "Failed to register a fork handler: " << strerror(result);
}

//创建信号句柄
signal_fd = signalfd(-1, &mask, SFD_CLOEXEC);
if (signal_fd == -1) {
PLOG(FATAL) << "failed to create signalfd";
}

//信号注册,当signal_fd收到信号时,触发HandlerSignalFd
if (auto result = epoll->RegisterHandler(signal_fd, HandleSignalFd); !result.ok()) {
LOG(FATAL) << result.error();
}
}

RegisterHandler
说明:信号注册,把fd句柄加入到epoll_fd_的监听队列中
system/core/init/epoll.cpp

1
2
3
4
5
6
7
8
9
10
11
12
13
14
15
16
17
18
19
20
21
22
Result<void> Epoll::RegisterHandler(int fd, Handler handler, uint32_t events) {
if (!events) {
return Error() << "Must specify events";
}
auto sp = std::make_shared<decltype(handler)>(std::move(handler));
auto [it, inserted] = epoll_handlers_.emplace(fd, std::move(sp));
if (!inserted) {
return Error() << "Cannot specify two epoll handlers for a given FD";
}
epoll_event ev;
ev.events = events;
// std::map's iterators do not get invalidated until erased, so we use the
// pointer to the std::function in the map directly for epoll_ctl.
ev.data.ptr = reinterpret_cast<void*>(&it->second);
//将fd的可读事件加入到epoll_fd_的监听队列中
if (epoll_ctl(epoll_fd_, EPOLL_CTL_ADD, fd, &ev) == -1) {
Result<void> result = ErrnoError() << "epoll_ctl failed to add fd";
epoll_handlers_.erase(fd);
return result;
}
return {};
}

HandlerSignalFd
说明:监控SIGCHLD信号,调用ReapAnyOutstadingChildren来终止出现问题的子进程
system/core/init/init.cpp

1
2
3
4
5
6
7
8
9
10
11
12
13
14
15
16
17
18
19
20
static void HandleSignalFd() {
signalfd_siginfo siginfo;
ssize_t bytes_read = TEMP_FAILURE_RETRY(read(signal_fd, &siginfo, sizeof(siginfo)));
if (bytes_read != sizeof(siginfo)) {
PLOG(ERROR) << "Failed to read siginfo from signal_fd";
return;
}
//监控SIGCHLD信号
switch (siginfo.ssi_signo) {
case SIGCHLD:
ReapAnyOutstandingChildren();
break;
case SIGTERM:
HandleSigtermSignal(siginfo);
break;
default:
PLOG(ERROR) << "signal_fd: received unexpected signal " << siginfo.ssi_signo;
break;
}
}

ReapAnyOutstandingChildren
system/core/init/sigchld_handler.cpp

1
2
3
4
void ReapAnyOutstandingChildren() {
while (ReapOneProcess() != 0) {
}
}

最终会调用到ReapOneProcess()方法
ReapOneProcess
说明:ReapOneProcess是最终的处理函数,这个函数先调用waitpid找出挂掉进程的pid,然后根据pid找到对应Service,最后调用Service的Reap方法清除资源,根据进程对应的类型,决定是否重启机器或重启进程
system/core/init/sigchld_handler.cpp

1
2
3
4
5
6
7
8
9
10
11
12
13
14
15
16
17
18
19
20
21
22
23
24
25
26
27
28
29
30
31
32
33
34
35
36
37
38
39
40
41
42
43
44
45
46
47
48
49
50
51
52
53
54
55
56
57
58
59
60
61
static pid_t ReapOneProcess() {
siginfo_t siginfo = {};
//用waitpid函数获取状态发生变化的子进程pid
//waitpid的标记为WNOHANG,即非阻塞,返回为正值就说明有进程挂掉了
if (TEMP_FAILURE_RETRY(waitid(P_ALL, 0, &siginfo, WEXITED | WNOHANG | WNOWAIT)) != 0) {
PLOG(ERROR) << "waitid failed";
return 0;
}

auto pid = siginfo.si_pid;
if (pid == 0) return 0;

//当我们知道当前有一个僵尸pid,我们使用scopeguard来清除该pid
auto reaper = make_scope_guard([pid] { TEMP_FAILURE_RETRY(waitpid(pid, nullptr, WNOHANG)); });

std::string name;
std::string wait_string;
Service* service = nullptr;

if (SubcontextChildReap(pid)) {
name = "Subcontext";
} else {
//通过该pid找到对应的service
service = ServiceList::GetInstance().FindService(pid, &Service::pid);

if (service) {
name = StringPrintf("Service '%s' (pid %d)", service->name().c_str(), pid);
if (service->flags() & SVC_EXEC) {
auto exec_duration = boot_clock::now() - service->time_started();
auto exec_duration_ms =
std::chrono::duration_cast<std::chrono::milliseconds>(exec_duration).count();
wait_string = StringPrintf(" waiting took %f seconds", exec_duration_ms / 1000.0f);
} else if (service->flags() & SVC_ONESHOT) {
auto exec_duration = boot_clock::now() - service->time_started();
auto exec_duration_ms =
std::chrono::duration_cast<std::chrono::milliseconds>(exec_duration)
.count();
wait_string = StringPrintf(" oneshot service took %f seconds in background",
exec_duration_ms / 1000.0f);
}
} else {
name = StringPrintf("Untracked pid %d", pid);
}
}

if (siginfo.si_code == CLD_EXITED) {
LOG(INFO) << name << " exited with status " << siginfo.si_status << wait_string;
} else {
LOG(INFO) << name << " received signal " << siginfo.si_status << wait_string;
}
//没有找到service,说明已经结束了,退出
if (!service) return pid;
//清除子进程相关的资源
service->Reap(siginfo);

if (service->flags() & SVC_TEMPORARY) {
ServiceList::GetInstance().RemoveService(*service);//移除该service
}

return pid;
}

解析init.rc

当属性服务建立完成后,init的自身功能基本就告一段落,接下来需要来启动其他的进程。但是init进程如何其他其他进程呢?其他进程都是一个二进制文件,我们可以直接通过exec的命令方式来启动,例如 ./system/bin/init second_stage,来启动init进程的第二阶段。但是Android系统有那么多的Native进程,如果都通过传exec在代码中一个个的来执行进程,那无疑是一个灾难性的设计。
init.rc是一个配置文件,内部由Android初始化语言编写(Android Init Language)编写的脚本。类似通过读取配置文件的方式,来启动不同的进程。

LoadBootScripts

说明:如果没有特殊配置ro.boot.init_rc,则解析./init.rc
把/system/etc/init、/system_ext/etc/init、/odm/etc/init、/product/etc/init这几个路径加入init.rc之后解析的路径,在init.rc解析完成后,解析这些目录里面rc文件
注意:init.rc位于/system/core/rootdir下
system/core/init/init.cpp

1
2
3
4
5
6
7
8
9
10
11
12
13
14
15
16
17
18
19
20
21
22
23
24
25
static void LoadBootScripts(ActionManager& action_manager, ServiceList& service_list) {
Parser parser = CreateParser(action_manager, service_list);

std::string bootscript = GetProperty("ro.boot.init_rc", "");
if (bootscript.empty()) {
parser.ParseConfig("/system/etc/init/hw/init.rc");
if (!parser.ParseConfig("/system/etc/init")) {
late_import_paths.emplace_back("/system/etc/init");
}
// late_import is available only in Q and earlier release. As we don't
// have system_ext in those versions, skip late_import for system_ext.
parser.ParseConfig("/system_ext/etc/init");
if (!parser.ParseConfig("/vendor/etc/init")) {
late_import_paths.emplace_back("/vendor/etc/init");
}
if (!parser.ParseConfig("/odm/etc/init")) {
late_import_paths.emplace_back("/odm/etc/init");
}
if (!parser.ParseConfig("/product/etc/init")) {
late_import_paths.emplace_back("/product/etc/init");
}
} else {
parser.ParseConfig(bootscript);
}
}

Android7.0后,init.rc进行了拆分,每个服务都有自己的rc文件,他们基本上都被加载到/system/etc/init,/vendor/etc/init, /odm/etc/init等目录,等init.rc解析完成后,会来解析这些目录中的rc文件,用来执行相关的动作。

CreateParser
说明:创建Parser解析对象,例如service、on、import对象

1
2
3
4
5
6
7
8
9
10
Parser CreateParser(ActionManager& action_manager, ServiceList& service_list) {
Parser parser;

parser.AddSectionParser("service", std::make_unique<ServiceParser>(
&service_list, GetSubcontext(), std::nullopt));
parser.AddSectionParser("on", std::make_unique<ActionParser>(&action_manager, GetSubcontext()));
parser.AddSectionParser("import", std::make_unique<ImportParser>(&parser));

return parser;
}

执行Action动作
按顺序把相关Action加入触发器队列,按顺序为 early-init -> init -> late-init. 然后在循环中,执行所有触发器队列中Action带Command的执行函数。

1
2
3
4
5
6
7
8
9
am.QueueEventTrigger("early-init");
am.QueueEventTrigger("init");
am.QueueEventTrigger("late-init");
...
while (true) {
if (!(waiting_for_prop || Service::is_exec_service_running())) {
am.ExecuteOneCommand();
}
}

Zygote启动

从Android 5.0的版本开始,Android支持64位的编译,因此zygote本身也支持32位和64位。通过属性ro.zygote来控制不同版本的zygote进程启动。
在init.rc的import段我们看到如下代码:
system/core/rootdir/init.rc

1
import /system/etc/init/hw/init.${ro.zygote}.rc // 可以看出init.rc不再直接引入一个固定的文件,而是根据属性ro.zygote的内容来引入不同的文件

init.rc位于/system/core/rootdir下。在这个路径下还包括四个关于zygote的rc文件。
分别是init.zygote32.rc,init.zygote32_64.rc,init.zygote64.rc,init.zygote64_32.rc,由硬件决定调用哪个文件。
这里拿64位处理器为例,init.zygote64.rc的代码如下所示:
system/core/rootdir/init.zygote64.rc

1
2
3
4
5
6
7
8
9
10
11
12
13
14
15
16
service zygote /system/bin/app_process64 -Xzygote /system/bin --zygote --start-system-server
class main
priority -20
user root
group root readproc reserved_disk
socket zygote stream 660 root system
socket usap_pool_primary stream 660 root system
onrestart exec_background - system system -- /system/bin/vdc volume abort_fuse
onrestart write /sys/power/state on
onrestart restart audioserver
onrestart restart cameraserver
onrestart restart media
onrestart restart netd
onrestart restart wificond
writepid /dev/cpuset/foreground/tasks
critical window=${zygote.critical_window.minute:-off} target=zygote-fatal

service zygote /system/bin/app_process64 -Xzygote /system/bin –zygote –start-system-server 解析:
service zygote :init.zygote64.rc 中定义了一个zygote服务。 init进程就是通过这个service名称来创建zygote进程
/system/bin/app_process64 -Xzygote /system/bin –zygote –start-system-server解析:
zygote这个服务,通过执行进行/system/bin/app_process64 并传入4个参数进行运行:

名称 说明
参数1 -Xzygote 该参数将作为虚拟机启动时所需的参数
参数2 /system/bin 代表虚拟机程序所在目录
参数3 –zygote 指明以ZygoteInit.java类中的main函数作为虚拟机执行入口
参数4 –start-system-server 告诉Zygote进程启动systemServer进程

init总结

init进程主要分为两个阶段,
第一个阶段主要完成了:

  • 创建文件系统目录,并挂载了相关文件系统
  • 初始化了日志输出系统
  • 加载了SELinux(访问控制安全模块)安全策略
  • 进入第二阶段

第二阶段主要完成了

  • 初始化了属性系统
  • 执行了SELinux第二阶段,并恢复了一些文件的安全上下文
  • 新建了epoll,并初始化了子进程终止信号处理函数
  • 设置了系统其他属性,并开启了属性系统
  • 解析init.rc来启动其他进程
本文链接:
http://longzhiye.top/2024/02/25/2024-02-25/